This little tutorial is in response to an interesting question on Newtek's forum, asking if there was a falloff option for Smooth Shift tool. The idea was to create a helix type object, that is thick in the center and tapers off...must be simple right?? Yes indeed :)
First we need a spline curve:
1/ Create a cylinder and shape it as shown. I used a six sided disc, because the final helix will have six arms.
2/ From the top view, use the Twist tool to deform the shape.
3/ Select the points along one of the loops.
4/ Create an open curve, cut and paste it into a new layer.
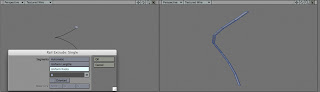
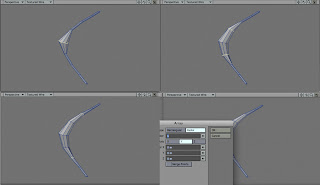
5/ Create an additional disc and with the curve in the background use Rail Extrude.
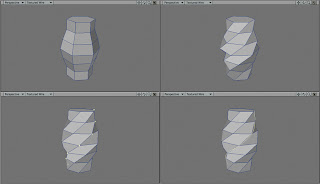
6/ Now comes the fun part, select the center edge loop and activate the Move Plus tool. While active, right click the mouse button and drag. Select the edge loops on either side and do the same but not as much, repeat for the last two loops.
7/ Once you're happy with the model, use the Radial Array tool to complete the object.

Boy....that was a lot of work...hehe.
You can also grab the Lightwave object with all the stages included: Helix Model.
Please Note:
About step 5: I only used Rail Extrude a handful of times, and couldn't get it to work with "oriented" option selected. So be aware, this is not a rail extrude tutorial, but one based on the Move Plus tool :)

First we need a spline curve:
1/ Create a cylinder and shape it as shown. I used a six sided disc, because the final helix will have six arms.
2/ From the top view, use the Twist tool to deform the shape.
3/ Select the points along one of the loops.
4/ Create an open curve, cut and paste it into a new layer.

5/ Create an additional disc and with the curve in the background use Rail Extrude.

6/ Now comes the fun part, select the center edge loop and activate the Move Plus tool. While active, right click the mouse button and drag. Select the edge loops on either side and do the same but not as much, repeat for the last two loops.
7/ Once you're happy with the model, use the Radial Array tool to complete the object.

Boy....that was a lot of work...hehe.
You can also grab the Lightwave object with all the stages included: Helix Model.
Please Note:
About step 5: I only used Rail Extrude a handful of times, and couldn't get it to work with "oriented" option selected. So be aware, this is not a rail extrude tutorial, but one based on the Move Plus tool :)
Comments